 08/19 ,2026
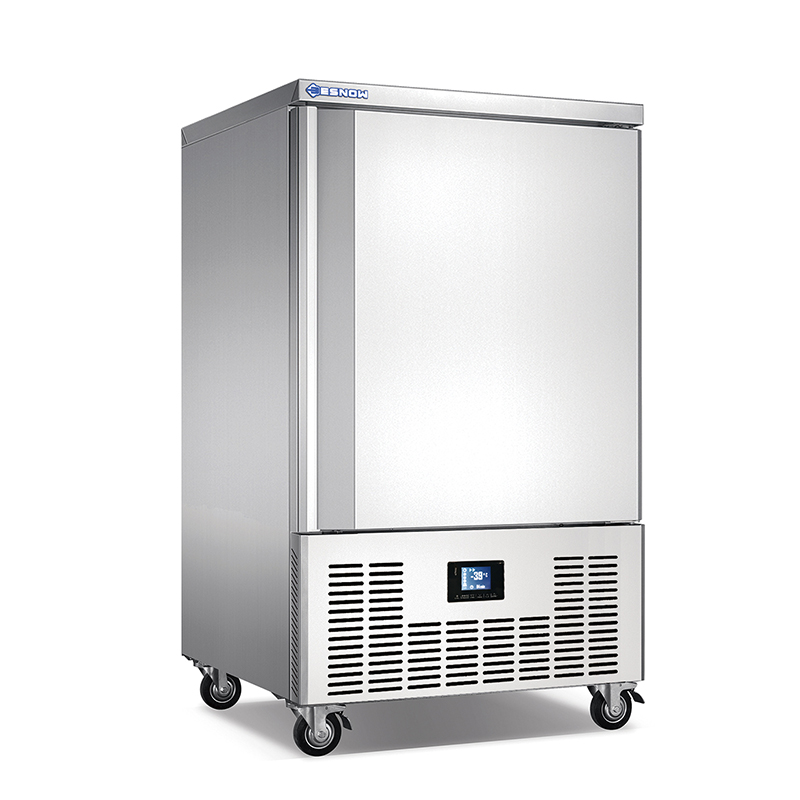
 To operate a commercial blast chiller correctly, load food in shallow pans, use a calibrated core probe, start the correct chilling program, and verify that the food temperature falls from 57°C to 21°C within 2 hours and to 5°C or below within 6 hours. This guide explains how to use a commercial blast chiller, commercial blast chiller temperature settings, and blast chilling food safely through practical steps. It also covers HACCP monitoring, core-temperature measurement, airflow management, and the operating method recommended by experienced commercial blast chiller manufacturers such as BEU.
A blast chiller is not simply a larger refrigerator. It removes heat rapidly with forced cold air, allowing cooked food to pass through the microbial growth range more quickly. The U.S. FDA Food Code commonly uses a cooling target of 57°C to 21°C within 2 hours, followed by 21°C to 5°C within the next 4 hours. If food remains warm for too long, bacteria such as Clostridium perfringens and Bacillus cereus can multiply. Correct loading, probe placement, sanitation, and recordkeeping are therefore as important as the refrigeration system itself.

Restaurants, bakeries, hotels, hospitals, central kitchens, and catering companies often cook large batches in advance. A deep stockpot or tightly packed container retains heat in its center, even when the surface feels cool. A commercial blast chiller solves this problem by combining low-temperature air, high airflow, and controlled circulation around the food container.
The main operating objectives are:
For example, a catering kitchen preparing 40 liters of soup may find that a standard refrigerator needs more than 12 hours to cool the center of a deep container. A blast chiller using shallow pans and correctly spaced racks can bring the same product to 5°C or below within the validated cycle time. The exact result depends on food density, pan depth, product volume, starting temperature, machine capacity, and the manufacturer’s specifications.
Before starting, check the machine’s rated batch capacity. Manufacturers usually state capacity in kilograms per cycle, pan count, or both. Do not assume that a cabinet rated for ten GN 1/1 pans can safely cool ten pans of dense stew at the same speed as ten pans of sliced vegetables.
Dense foods such as curry, rice, beans, mashed potatoes, sauces, and braised meat transfer heat slowly. Products with high water content and loose structure, such as sliced fruit or leafy vegetables, usually cool more quickly. Use the product’s actual batch profile—not only the cabinet’s maximum pan count—to create a validated cooling schedule.
As a practical example, 10 kg of cooked rice placed in one deep container may cool much more slowly than the same 10 kg divided into five 2 kg shallow pans. Dividing the batch increases the exposed surface area and shortens the distance heat must travel to reach the cold air.
Have the following items ready before loading the commercial blast chiller:
Check the probe before use. An ice-point test should read approximately 0°C in a properly prepared ice-water slurry. A boiling-point test should read approximately 100°C at sea level, with adjustments for altitude. If the thermometer differs from the reference by more than your local food-safety limit, recalibrate or replace it.
BEU and other commercial blast chiller manufacturers may use different control panels, probe positions, fan settings, and cycle names. Always compare the machine’s instruction manual with your kitchen’s food-safety plan rather than copying settings from a different model.
Immediately after cooking, record the product name, batch size, cooking completion time, and initial core temperature. Insert the sanitized probe into the thickest part of the product, avoiding contact with the pan wall or base. A reading taken only at the surface can be several degrees lower than the center.
For a large batch of beef stew, record a starting core temperature such as 82°C. The cooling clock should begin when the food leaves the cooking process, not when the operator remembers to start the chiller.
Transfer the food into shallow pans as soon as practical. Spread the food to an even depth and avoid stacking pans directly on top of one another without an air gap.
Place the pans on the rack according to the cabinet’s airflow design. Do not cover pans tightly during the active chilling stage unless the manufacturer and food-safety plan specifically allow it. A tight cover can reduce direct contact between cold air and the food surface.
Insert the probe into the geometric center or thickest point of the densest product. For a pan of lasagna, place the probe into the middle layer rather than near the surface. For sauce, rice, or mashed potatoes, use the deepest central area.
If the machine has a food probe, ensure that the cable does not interfere with the door gasket. A poorly positioned cable can prevent the door from sealing and cause the compressor to run continuously.
Choose the chilling mode rather than the freezing mode when the goal is refrigerated storage. Common programs include:
For chilled storage, a common target is 3–5°C at the food core. Set the target according to your local regulations, product specification, and manufacturer instructions. The cabinet air temperature may be below 0°C during part of the cycle, but the product core should be monitored separately.
Close the door firmly and start the cycle immediately. Each door opening introduces warm, humid kitchen air and can increase the cooling time. In a busy kitchen, assign one operator to monitor the cycle rather than allowing multiple staff members to open the cabinet repeatedly.
For a 15 kg batch of chicken soup, opening the door every 10 minutes to check the surface may produce a misleading impression of progress while adding heat to the chamber. Use the display and the core probe instead.
At minimum, verify the food core at the two-hour point and at the end of the cycle. A typical compliance target is:
| Cooling stage | Target | Action if the target is missed |
|---|---|---|
| Initial hot stage | Record the starting temperature and time | Begin cooling without delay |
| First checkpoint | 57°C to 21°C within 2 hours | Reassess pan depth, loading, airflow, and equipment performance |
| Final checkpoint | 21°C to 5°C within the next 4 hours | Follow the corrective action in the HACCP plan |
| Storage | Maintain at or below the local refrigerated-storage limit | Transfer to a functioning refrigerator and label the product |
Do not rely on the cabinet air display alone. A chamber temperature of 0°C does not prove that the center of a 60 mm-thick pan of curry has reached 5°C.
When the core temperature reaches the validated target, remove the pans with clean gloves or utensils. Check at least one additional location in a large batch when practical. If the product is uneven, record the warmest reading rather than the coldest reading.
Label each container with:
Move the food promptly to a refrigerator or cold holding unit. Do not leave finished pans on a preparation table while staff complete unrelated tasks. The blast chiller removes heat; it is not a substitute for controlled refrigerated storage.
After unloading, remove food particles, wash removable parts, sanitize food-contact surfaces, and clean the door gasket. Follow the chemical concentration and contact time specified by the sanitizer manufacturer.
Inspect the condenser and ventilation area according to the maintenance schedule. A blocked condenser can increase energy use, extend cycle time, and raise the risk of high-pressure faults. Record service work, probe calibration, gasket replacement, and any alarm codes.
There is no single cycle that works equally well for every product. Use the following starting framework, then validate it with actual core-temperature data:
| Food type | Recommended preparation | Primary risk | Monitoring focus |
|---|---|---|---|
| Soup and sauce | Use shallow pans; stir safely before loading | Slow center cooling and skin formation | Core temperature and pan depth |
| Cooked rice and grains | Spread in a thin, even layer | Bacillus cereus growth during slow cooling | Time from cooking to refrigeration |
| Roasted meat | Separate large cuts or use validated portions | Warm center and moisture loss | Thickest section and product yield |
| Pastry cream and custard | Use sanitized shallow containers | Microbial growth and surface contamination | Probe hygiene and covered storage after cooling |
| Fresh-cut produce | Remove excess surface water before chilling | Condensation and texture damage | Airflow, humidity, and surface temperature |
For delicate foods, excessive airflow can increase dehydration. For dense foods, insufficient airflow can create a cold surface and warm core. The correct setting is the one that consistently achieves the required internal temperature without unacceptable product loss.
In a documented catering-kitchen trial, an operator cooled approximately 18 kg of tomato-beef sauce in two deep containers. The surface reached 8°C after several hours, but the center remained above 20°C. The batch was divided into nine shallow stainless-steel pans, each holding approximately 2 kg, and the pans were loaded with air gaps between them. The operator then used a sanitized core probe and a probe-controlled blast-chilling cycle.
The first trial achieved 19°C at the two-hour checkpoint and 4°C at the final checkpoint. The result was not attributed to the cabinet alone: the improvement came from smaller portions, reduced pan depth, unobstructed airflow, accurate measurement, and immediate labeling. The kitchen added the method to its HACCP procedure and required staff to record the warmest pan rather than selecting the lowest reading.
A second example involved a bakery producing pastry cream. Staff had been placing a hot, tightly covered 10-liter container in a refrigerator, where the center remained warm overnight. After switching to shallow pans and using the blast chiller’s soft-chill mode, the cream reached 5°C in the validated cycle and showed less surface skin formation. The bakery still required a final core-temperature check before storage because the programmed time alone could not account for daily batch variation.
These cases show why a commercial blast chiller manufacturer’s rated capacity should not be treated as a guarantee for every recipe. The actual result depends on the product’s thermal properties, container geometry, loading arrangement, and measurement method.
Problem: The surface cools while the center remains above the safety target.
Solution: Use shallow pans, divide large batches, and validate the maximum product depth. Dense foods may require stirring or smaller portions.
Problem: The machine runs for an extended period, and some pans remain warmer than others.
Solution: Reduce the batch size, follow the rated loading pattern, and leave the specified clearance around the evaporator and air outlets. Never block the fan path with oversized containers.
Problem: The operator records a safe-looking temperature that does not represent the food core.
Solution: Sanitize the probe and measure the thickest center section. Check multiple pans when the batch is large or the product is uneven.
Problem: The product develops ice crystals, damaged texture, or unnecessary energy consumption.
Solution: Select the chilled-storage program and confirm the target temperature before starting. Use blast freezing only when the product is intended for frozen storage.
Problem: Cooling time increases and condensation forms inside the chamber.
Solution: Use the display and connected probe, assign one operator, and open the door only for necessary checks or unloading.
Problem: The compressor runs continuously, the cycle becomes inconsistent, or alarm codes appear.
Solution: Clean the gasket, inspect the seal for cracks, maintain condenser clearance, and schedule preventive service according to the BEU or equipment manufacturer’s manual.
Problem: Staff assume that a 90-minute cycle is always sufficient.
Solution: Use time as a control point, but verify the product core temperature. A 90-minute setting validated for vegetable soup may be unsuitable for a dense meat sauce.
Problem: The thermometer transfers bacteria or allergens between batches.
Solution: Clean and sanitize the probe before and after every measurement. Use separate utensils for allergen-controlled products when required by the site’s procedures.
A useful cooling log should be simple enough for staff to complete during service. Include:
If the food fails the first cooling checkpoint, do not simply extend the cycle without investigation. Check whether the pans are too deep, whether the machine was overloaded, whether the probe was placed correctly, or whether the door seal and airflow system are defective. Your local authority may require specific corrective actions, such as rapid reheating, disposal, or documented evaluation.
Correct operation can also reduce operating cost. Pre-cool only when appropriate, avoid loading warm pans that exceed the cabinet’s design capacity, keep the condenser clean, and maintain the door seal. A dirty condenser increases heat rejection resistance, which can lengthen cycles and increase compressor runtime.
For consistent product quality:
BEU commercial blast chilling equipment should be operated according to the specific model manual, rated capacity, and local electrical and food-safety requirements. If the cabinet repeatedly fails a validated cycle despite correct loading and measurement, stop using it for safety-critical cooling until a qualified technician checks the refrigeration circuit, sensors, evaporator airflow, and control system.
The reliable workflow is straightforward: divide hot food into shallow pans, record the starting time and temperature, load the cabinet without blocking airflow, select the correct chilling program, place the core probe in the thickest area, verify the 57°C-to-21°C and 21°C-to-5°C cooling stages, label the finished product, transfer it to refrigerated storage, and clean the equipment.
The most important practical lesson is that a blast chiller cycle is successful only when the food core—not merely the cabinet display or surface—reaches the required temperature within the required time. Use documented measurements to validate each recipe, train staff on probe hygiene and loading patterns, and follow the instructions provided by BEU or your chosen commercial blast chiller manufacturer.
The correct setting depends on whether you are chilling or freezing. For refrigerated storage, the food core is commonly chilled to 3–5°C, subject to local regulations and your HACCP plan. The cabinet air may temporarily operate below 0°C. Always prioritize the food-core target and the machine manual.
Many products can reach 5°C within 90 minutes to 3 hours, but there is no universal time. Product density, pan depth, batch weight, starting temperature, airflow, and cabinet capacity all affect performance. Validate the cycle with a calibrated probe rather than relying on a standard timer.
Yes, if the equipment is designed for hot-food loading and the food is placed in suitable shallow pans. Start the cooling cycle immediately, avoid overloading, and follow the manufacturer’s maximum loading instructions.
Do not tightly cover food if the cover blocks cold-air contact or slows heat transfer. After the food reaches the validated refrigerated temperature, cover it with an approved food-grade lid or film to protect it during storage. Follow your sanitation and allergen-control procedures.
No. A blast chiller rapidly reduces product temperature, while a refrigerator maintains already chilled food. After the cycle, transfer the product to a refrigerator or cold-holding unit that can maintain the required storage temperature.
This usually results from excessive product depth, dense food structure, poor airflow, overloading, or an inaccurate measurement method. Divide the batch into shallower pans, leave air gaps, use the core probe correctly, and verify the cabinet’s performance.
Follow your food-safety plan and local requirements. Many kitchens perform a routine check at least monthly and whenever the probe is dropped, exposed to excessive heat, or suspected of giving incorrect readings. A calibration record should include the date, reference method, result, and corrective action.
Separate the affected batch, record the actual time and temperature, and follow the corrective action in your HACCP plan. Investigate pan depth, batch size, door opening, probe placement, airflow, gasket condition, condenser cleanliness, and refrigeration performance before repeating the process.

To visit Guangzhou BEU Electric Appliance Co., Ltd. (called as BEUEA below) website, you are agreeing the terms and conditions within this policy.
BEUEA respects your privacy and will protect your information remains confidential.
We will not lease, sell, or rent your information to the third party for their independent use under any circumstances.